Dynamic Wallboards
Wallboard Application
To apply for a new wallboard, please use the following link.
The video below shows an overview of the Dynamic Wallboards product including configuring of the cards that make up the wallboard content.
User Access Permissions
There are 3 levels of user access permission as defined below. When a new user access permission is added, an email is sent to that new user asking them to either verify their account or to let them know they have been given permission to access the wallboard. Wallboard users will not be able to access the wallboard until they have verified their account.
PLEASE NOTE: Check SPAM/JUNK folders in case the email has been moved there.
| User | Standard user who is able to view the wallboard |
| Super User | As per standard user, but also with the ability to edit the layout of the wallboard |
| Administrator | As per Super User, but also the ability to add new user access permissions |
Overview
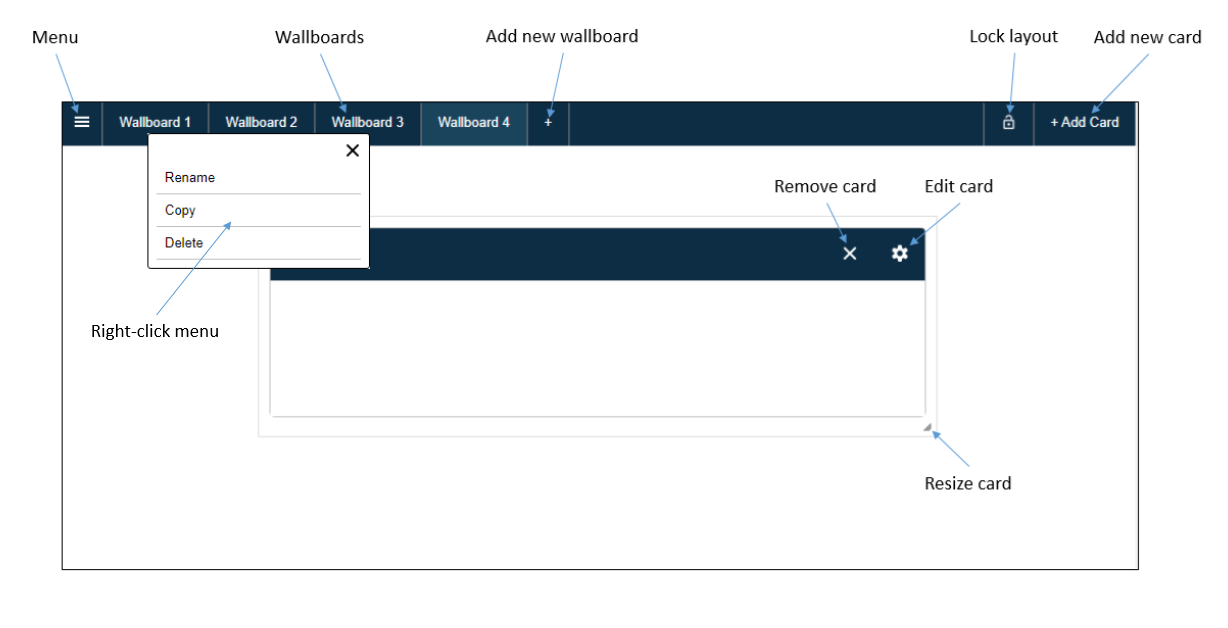
Below is a brief description of the features of the dynamic wallboard.

| Menu |
Drop-down menu listing options depending on wallboard user access permissions including:
|
| Wallboards | Switch between the different wallboard layouts configured for this PBX. Wallboard tabs can be renamed by right-clicking on the title and selecting 'Rename'. |
| Add new wallboard | Add a new wallboard layout |
| Delete wallboard | Delete the currently selected wallboard layout |
| Lock layout | Unlock: Editing of the wallboard layout is possible. Locked: Wallboard layout is saved and editing features removed to see how it will look to wallboard users with 'User' permission |
| Add new card | Add a new card to the currently selected wallboard layout. See below for the different card options |
| Remove card | Remove the specific card from the currently selected wallboard layout |
| Edit card | Edit the specific card from the currently selected wallboard layout |
| Resize card | Resize the specific card from the currently selected wallboard layout |
Notes:
- In order to save any amended configuration, the lock button must be clicked as locked. Until then, the configuration will remain with the original configuration.
- Caution should be taken if multiple instances are able to update the configuration to ensure one instance doesn't overwrite configuration changes made by another instance.
Add new card
There are currently 5 types of card that can be added to the wallboard layout as listed below.
| Agent list | Create a list of agents/PBX users to get for specific queues, including extension, name, calls in/out/internal, status etc. |
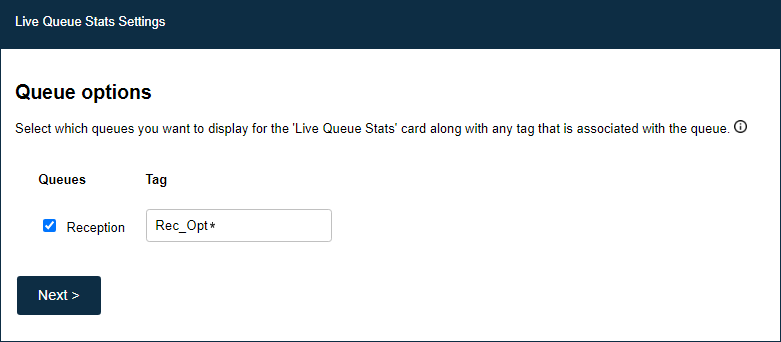
| Live Queue Stats | Create a table of live data specific to the selected queues including number of available agents, calls in progress, queue length, last wait time |
| Queue Totals | Create a table of queue data including number of calls in, calls routed, calls missed and maximum length. |
| Single Data Points | Create a card with a single item of information, including available agents, calls in/out/internal/missed/unreturned, average answer time, longest duration etc |
| Chart/Graph | Create a chart/graph for specifically selected queues including SLA on calls answered, breakdown of calls types (in/out/internal/missed), gauge of percentage of answered calls and stack chart of calls types (in/out/missed) per hour. |
Tags
When selecting queues (aka Call Groups), the queue must be tagged with a specific unique tag in the PBX. The tag is case-sensitive, so ensure the tag matches the value in the PBX.
It is often the case that a single call group might have multiple dialplan rules with different tags, but all routing to the same call group. In this case, it is best to have structured the dialplan rule tag with a common text string and then add that common text string as the tag when adding the queue card to the wallboard.
For example:
| Rule name | Tag | Call Group |
| Option1 | Rec_Opt1 | Reception |
| Option2 | Rec_Opt2 | Reception |
| Option3 | Rec_Opt3 | Reception |

Notes:
- The * wildcard is supported at the beginning or end of the tag string.
- For the Agents list card, it is possible to show all calls (no matter what queue/tag), by entering just * into the tag field.
- If the Maximum Concurrent Calls card is required, then the PBX will require a specific tag. Append the tag on the PBX with calls:${GROUP_COUNT(Trunk)} and then use the * wildcard. For example, when the tag is Reception:
| PBX Tag | Wallboard Tag |
Reception, calls:${GROUP_COUNT(Trunk)} | Reception* |
- It is possible to append new tags to the existing tags defined for a call by using the following syntax in the dialplan ${TAGS}
| PBX Tag | Result |
${TAGS}, Reception | This will append Reception onto the end of the existing tag |
Inline comments
When editing wallboards, further detailed information can be found by hovering/clicking on the information icon.

Appendix
1. Wildix Authentication
Wildix license with WebAPI - TAPI - Integration required for agent status and live queue data and an administrator account require for accessing call data via Call History API.

2. Browser Support
Please note that the wallboard requires an Internet browser that supports asynchronous javascript. Most desktop browsers now support asynchronous javascript and our recommendation is to use Chrome. Some older TV browsers may not have support for this yet - so please check the device that the wallboard will run on. The link below will help identify whether asynchronous javascript it supported. If supported, it will respond with PASSED. If not supported, it will just remain as 'Checking async support...'
3. Troubleshooting
| Issue | Possible resolution |
| You are receiving the message: PBX disconnected - you may need to logout of Collaboration but you are logged out of Collaboration | There may still be a session open with the PBX using a non-authorised user. You can try forcing a logout by going to the following URL in your browser: https://{yourdomain}.wildixin.com/api/v1/personal/logout |
| You are unable to drag cards to the bottom of the page | The height of the screen is determined when you first login to the Dynamic Wallboard. If you have changed the zoom level of the browser, then this may impact the available screen height. Try reloading the page once the zoom level is set to update the available screen height. |
| All the cards have disappeared apart from one | The wallboard needs to be locked in order to save the configuration. If the lock button has not been clicked, it's possible that the cards are laying on top of each other. Try moving the top card to see if the others are below - if so, ensure the lock button is ticked when the layout is finalised. |